Let’s say you are trying to install a WordPress plugin or add PHP files to your website. But your website fails to load and shows a fatal error message that tells you, “You don’t have enough memory.”
However, you don’t have any idea why it happens and how to solve this problem in the right way. Don’t worry you are not the only one who faces this issue.
Table of Contents
So, in the following guide, we are going to let you know how you can change the PHP memory limit in your WordPress website, which will solve the issue. Before that, let’s understand what the PHP memory limit is and the reasons for the WordPress Memory Exhausted Error.
What Is the PHP Memory Limit?
PHP is a server-side scripting language especially used for web development. It helps you process and execute the PHP codes to operate themes, plugins, and core files on WordPress websites.
The PHP memory limit refers to the maximum amount of memory within which a WordPress site has to execute its operations. By default, WordPress sets the PHP memory limit of 32MB, but some web hosting providers increase this to 64MB for all users.
The default memory limit (32MB) is good enough for websites working with small plugins and limited media files. If your website has lots of programs, your web server will require more memory to function the site.
If you want to build an eCommerce website or want to use a page builder like Elementor to design, your website will surely require increasing the memory limit. Because those large-sized plugins will need more memory to work flawlessly well.
What Happens Due to Insufficient PHP Memory Limit
One common problem arising from insufficient PHP memory limit is the “Allowed memory size exhausted” error, like the image below. This error usually occurs when the PHP script tries to allocate more memory than what is available within the defined limit.
 1")
Another problem that can arise is the “Out of memory” error. This can occur while the script tries to execute memory-intensive operations or deal with large amounts of data.
All these can result in degrading the overall website performance. As a result, you’ll face slower execution times and increased response times in running web applications.
1. Increase PHP Memory Limit Via FTP
To improve the PHP memory limit of your website, you need to edit your wp-config.php file. You can easily access your wp-config.php using an FTP server like FileZilla. It’s free, so you can download and use it to access your website’s backend files.
Learn what is an FTP server and how it works. After finishing the FileZilla setup, you can connect your website to it. Then, you just need to find and open the wp-config.php file.
 3")
Now it’s time to add the below code snippet to the wp-config.php file (paste it at the end of the code).
define( ‘WP_MEMORY_LIMIT’, ‘256M’ );
Don’t forget to save the file after editing.
Now you have defined your website’s PHP Memory Limit of 256MB. That is perfect for all websites.
Note: You can increase the memory limit to 512MB based on your need.
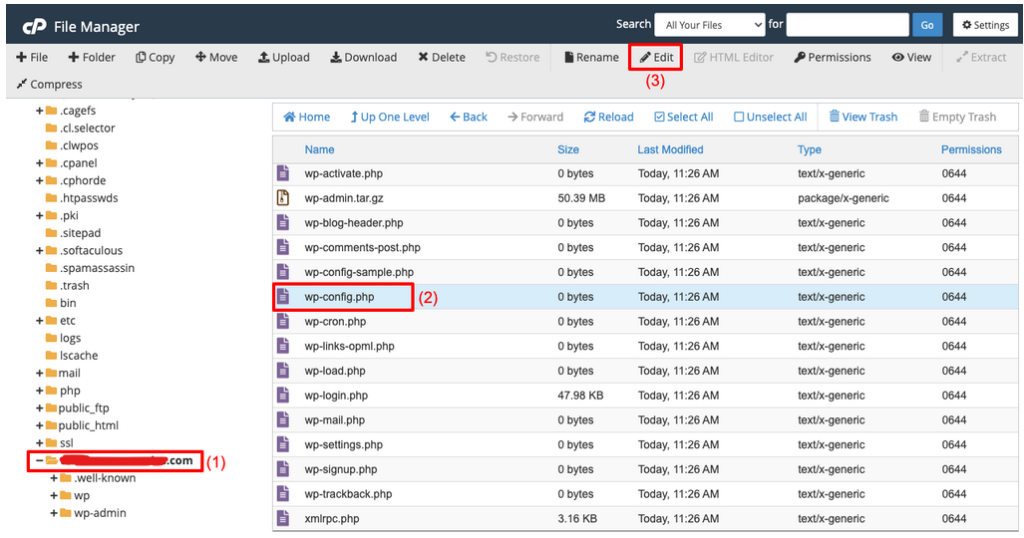
2. Increase PHP Memory Limit Via cPanel
Log in to your cPanel account using the right credentials. Find and click on the File Manager option.
 4")
Then navigate to the public_html > your website > wp-config.php.
Copy and paste the following code to the respective section on the page.
define( 'WP_MEMORY_LIMIT', '256M' ); 6")
Then, save the file.